Now that I'm getting older I have decided to make a permanent home for my telescope. As having to lug my heavy Meade 10" Schmit Newtonian out side every time I use it is not going to get any easier in the future.

So here I'll be blogging all the trials, tribulations, successes and failures (of which there will be many I'm sure) of building an astronomical observatory from scratch.

Saturday, March 24, 2012

Phase 2 Part2

Things are really taking shape now after spending the whole day in the garden putting the observatory together. I was very pleased at the ease of this construction, from this.......


..... to this in less than an hour,.

By 3pm I was ready to try the scope on the mount..


 Not a bad fit if I say so myself!


The rest of these photos were taken by Hazel, my eight year old daughter, she was clicking away on my Cannon EOS 300D like David Bailey. I think this gives a nice childs eye perspective on this build and the world!


My Meade LXD 55 fit's just nice into here when it's parked in the Polar home position, but the jury is still out on what I'm going to do with the roof. At the moment I'm thinking of using corrugated plastic  sheet/sheets for the roof co cut down on the weight. I know this will mean reenforcing the body of the observatory but that was always in the plan.


Here's me in DEEP THOUGHT trying to work how to keep the doors closed.


 Here's me do my ZAPHOD BEETLEBROX  impression, just before the other head pops out.
 A childs eye sees the world so differently!


 A few more minor adjustments and ..........


.......WHAAAALLLLAAAAA!!!!!!!!!!!    the finished article ! (well almost)


This is going to work! As you can see I'm feeling fairly pleased with myself as this is going just to good, the few weeks of planning is starting to pay off  :-)


Once again a BIG Thank you to my wife for the help and advise, and to Hazel for taking such fantastic photos.


Friday, March 23, 2012

First Light

Last night allowed me to test my pier out for the first time and I must say it preformed better than I could have wished for. I had worries about vibration transfer after asking for advise on the Stargazers Lounge forum, where I was told that vibrations would transfer through the floor up the pier to the scope. B****cks  I can kick the pier and any vibration settles down within five seconds. This all-in one concrete floor/pier design works!


Don't just take my word for it here is the test photo I took of M81/ 82, a 50 second image unguided as I walked around the scope.Where's the vibration? I know there is allot of noise in this photo, it is just a test shoot as I stated but it made me very happy to have detail in M82 without having to use Registax.


Sunday, March 18, 2012

Phase 2


 It was a nice day here today, far to good a day to waste, so I set about laying the base of the observatory. 
As you can see I dared to take the shuttering away from the concrete base and low and behold it didn't crumble away, that was a bonus. Plus the dimensions are good to and there is little movement it the four floor panels too so the base must be level, PHEW!


I made a slight modification to the floor panels to allow the pier to come through, was worried that this would weaken the panels but no, the structural integrity held. 


I treated the base and the rest of the panels to a coat of cuprinol to protect them from the harsh Scottish weather. Here's hoping for some more good weather next weekend for a bit of construction work.


Tuesday, March 13, 2012

Phase One Completed

Phase one of the observatory is now complete, just could not help myself tonight when I got home just had to see what the set up looked like. I must say I like it!!!! 
I know a few people in the SGL were worried about vibration transferring through the floor and up the pier, those  fears can now be put to bed. I aim the scope at a near by church steeple and then stamped  my feet on the base, not an iota of a shake was seen. My plan worked well. (Smug mode). 


It looks like a professionally made mount, not bad for a £28 soil pipe, £4 of M10 threaded bar, a scrap brake disc and a bit of concrete (OK allot of concrete). It is a solid as a rock too, there is no slop in bar or mount at all.


I will be looking forward to a clear night or two now so I'll be able to test my new rig, so if we have cloud for the next two months it will be my fault for having something new to play with, all you astronomers know the score on the new equipment clear night paradox!


This weekend will be time to plan the erecting of the shed, really must start calling it the observatory not a shed! Got some real planning to do with regards to the opening of the roof now.

Sunday, March 11, 2012

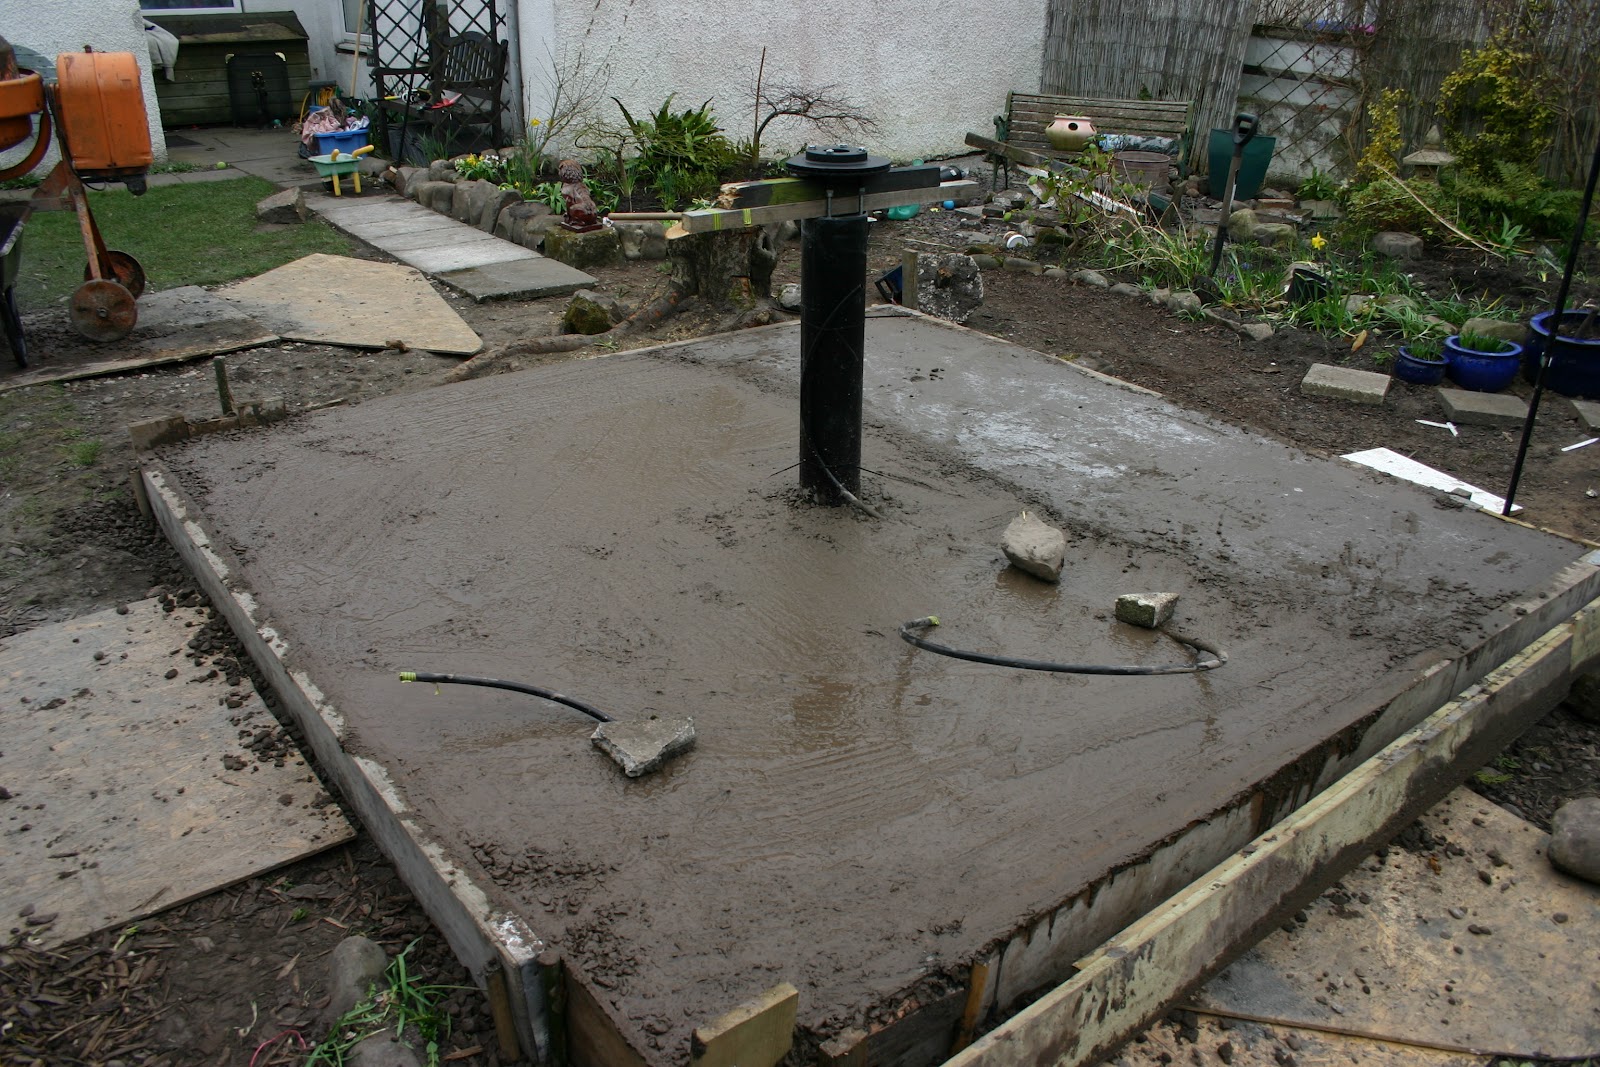
Concrete base done

Well the concrete base is laid, I have spent most of the weekend mixing and spreading. I'm so glad I borrowed this cement mixer from a friend as I was planning to mix the aggregate by hand, my body aches enough from loading the mixer think it would have killed me if I had chosen  the hand mixing option.


First in was the pier and mounting plate, very pleased to say that everything ended up nice and level.
I learned a very valuable lesson on Saturday about aggregate quantities that I would like to pass on to anyone who may be planning a similar venture. Work out the  quantity you need then add 60% to the total,  yes you guest it I didn't have enough All-in Ballast to do the whole base. So it was a quick dash to B&Q at 4pm on Saturday evening for ten large bags of  ballast. Surly that will be more than enough I thought, huh I thought wrong. 1.25 tonnes and ten large bags of ballast was only enough to do the pillar hole the pillar and one third of the base. Was starting to lose the light anyway at 6:30pm so decided to cover it all with the tarpoline and go to the pub for a well earned pint and a couple of wee drams.


Daddies little helper 
Sunday morning back down to B&Q I went for 20 bags of ballast and a bag of concrete, this lot tested the suspension of my Vectra estate I can tell you. (not to self, check springs and shockers in the morn)!
As you can see from this picture below I had a little help today from my daughter Hazel, she was happy moving the empty wheel barrow around but was not so keen when it was full.


I think Hazel recons she Bob the Builder here, Can we fix it?  Yes we can!


I'm very pleased with this DIY mounting as you can see I pained the soil pipe black to make it look a little less like a poop pipe and more a proper pier. 
(the wooded poles under the disc are just there to set the height of the mount and will be removed when the concrete in the pipe has fully hardened)


 All done and dusted, you can see how far I got on Saturday with the 2tonnes of ballast here not even up to the  pier, not ideal I know but these things happen.


I know allot of people advised me to cement the pier separately from the base as apparently vibrations can be transferred from the floor up the pier. I'm no going to be having a ceilidh in the observatory and will be seated at the laptop when imaging, and decided to go with my original plan of an all in one mount and base.  

I must put out a very big thank you to my wonderful wife who helped with the leveling  and for keeping the tea and coffee flowing!

Thursday, March 8, 2012

Pier & Mounting Plate

The 160mm soil pipe I ordered from Ebay arrived yesterday, so tonight I after work I decided to cut it to the right size and place it in the hole to see how it looked. Not bad even if I say so myself. At the moment the  pipe is in my shed with a coat of primer on it ready to be spay painted black tomorrow. I'm hoping to have it cemented in by the weekend (weather permitting), as I'm of to hire a van tomorrow to collect a cement mixer from a good friend in Kinloss.


I also redesigned the mounting plate again tonight, by placing some spacers between the level adjusting nuts and the pier head, (brake disc). This will   make it allot easier to level the head when it is cemented into the pier.

 A close up of the leveling bolts and spacers

I think you will agree that the disc look better know it's spray painted in mat black.


Saturday, March 3, 2012

New roof plan

 OK here goes plan 2 for the roof, due to the eave overhang I can't hinge at the base of the roof so am going to put the hinges higher up. This will help reduce the weight of the roof too.

ROOF CLOSED


ROOF OPEN (one side)


You can also see I'm working on the idea of using threaded bar to tie the two roof half together when closed.

Hardcore

Don't get excited folks, not that type of hardcore but this type-


Had a very busy day today moving and smashing up old pattio slabs to lay as the hardcore for the shed base, but I must admit my wife once again did most of the smashing. I did ask at one point do you want me to do that? but the look on her face as she swung the sledge hammer made me scared so I didn't ask again.
It is done now thank God, next week end it'll be time for the concreting. A friend of mine has offered to lend me a cement mixer just need to find a way of getting it here now.
HELL THIS THING IS STARTING TO LOOK BIG!!!!


Once we had finished the grab and smash I decided to have a rethink of the pier head as the bolt I planned to use would make it a little difficult to attach the mount due to the small space between the pier and head, just a 5 minute job (so I thought) to swap the bolts for threaded bar like so!


That was until I tried to fit the mount and for some reason it would not fit in between the locking nuts time for a redesign think again. So back outside with the workbench and drill.


I extended the bolt hole outward to there maximum to allow for the mount to fit in snugly, (in other words there was just enough space on the brake disc)! Which it did and moved freely to allow for azimuth adjustment. "I'll just check that I get a good view though the polar scope" I thought to myself at this point, good job I did to. As yes I could see through it but not comfortably as my cheek was resting on the braking surface of the brake disc. THINK THINK THINK?????? Back out to the workbench this time armed with the angle grinder. So much for that 5 minutes this is now 2 hours later!


 I ground a flat off of the south facing side of the disc taking away as much as I dared without the disc losing the majority of its strength or cracking.
Here is the end result, it may not be pretty but hey. I'm not going to be hanging it on the wall am I?
It works it allows me to get a good polar alignment, which is always a bit of a neck beaker here at 57.3N.


Now for the fixings, a bonus for extending the bolt holes was that rubber mount I wanted to use now fits into the gap between the threaded bar. This rubber mount is an old front MacPherson strut top mount off the same car that the brake disc came from. I'm starting to get the name of magpie at work as I see something shinning pick it up and take it home! I wanted to use this rubber mount as I'm hopeing it will dampen down any vibration coming from the pier.The bolt is the original one from the LXD mount.


Here it is in situe, once tight the EQ mount is as solid as a rock  and does not budge a millimeter.


TADAAAAA, here's the finished arrtical, well it will be when the disc is painted, as you can see it very well balanced sitting nicely on the four pieces of threaded bar. Just out of interest sake I weighed it, the total weight of the plate and EQ mount came in at 10.8Kg with the weight of the plate at 5Kg. The next time you see this will be when it's cemented into the pier, wish me luck with that one!


Thursday, March 1, 2012

Building materials are here


The All-in Ballast and cement arrived on Monday managed to get the cement moved before the rain came but realised the ballast will have to wait until another day as darkness was closing in.


I have to say a very big thank you to my wife Teri for shifting the 1.25 tons of ballast while I'll was at work on Tuesday. What a woman!


Not only did she move the ballast but also broke up some of the old paving slabs I'm using for hardcore below the concrete, What a woman!
Had real problems finding a 160mm soil pipe in Elgin for constructing the pier, so I turned to my favorite shop Ebay, 160mmx3M for £25inc postage ordered and should be here by the weekend. Been down with manflue since Tuesday so very little has happened outside over the last few days, but have had plenty of time to think about the observatory roof. Plans will follow in the next blog update.


Saturday, February 25, 2012

The mounting plate

I've had very productive day today, not only have I dug out the foundations for my observatory but also made the mounting plate for the pier head. just a couple of finishing touches like a spacer between the disc and the EQ mount, and to manufacture something for the adjusting screws to work against. I'm very please how the old brake disc came up with the grinder. Had a comment from somebody in the Stargazers lounge about how we people in Scotland are tight with cash, very glade he realized that I was recycling this old brake disc an not scrimping! 


In a bit of a hole


 The shuttering is now at the correct size for the observatory foundations, 2.7x2.7M and the central hole for the pier is at the right depth, so pleased that I didn't find any service pipes which was what I had feared.


I struggled to find a steel lintel the right size locally so I improvised adapted and overcame by dismantling the rotary washing line and used the central pipe as the lintel. Don't tell the wife!


Now I'm ready for the Ballast and cement delivery on Monday/Tuesday.


Friday, February 24, 2012

The Chainsaw massaker

My new (toy), right Mr apple tree as of tomorrow your fire wood.


And now the end is near!


Now I STUMPED, my new toy just isn't quite man enough to get through this gert big stump. I don't care though as the offending root has gone so I can now get on with ground work.